AdMob is a mobile app advertising platform developed by Google which allows you to monetize your Android and iOS apps through in-app advertisements. You can use AdMob to create 4 main types of ads: banner, interstitial, rewarded, and native.
We will talk more about each of these ad types and discuss how to utilize them best. AdMob is extremely easy to set up; you can use your existing Google account to create an AdMob account. From your AdMob dashboard, you can do all sorts of things to manage monetization in your apps. You can track app performance, create ad campaigns, prioritize multiple ad networks through mediation, and even set up filters to block certain ads from appearing.
AdMob integrates perfectly with Google Analytics to give you data on key metrics such as user acquisition, engagement, retention, churn, revenue estimations, screen views, app version, sessions, etc. By examining this data, you can optimize your ad placement, refresh rate, and type to improve revenue figures.
It is also possible to segment audiences to better understand how people use your application and what audience base you need to target. You can connect AdMob to AdWords, which will help you install campaigns for your mobile app.
What does this mean? Well, the goal of any mobile app advertising campaign is to get entice more paying users into downloading your app., Or even non-paying users for that matter, because a larger install base is always a good thing. It is free marketing through social media and word of mouth.
Besides, the larger download figures and reviews will attract even more people to the app. So how to do it? Simple, Google will promote your app across its largest platforms- Google Search, Google Play Store, Youtube, and the Google Display Network.
Unlike regular ad campaigns, AdMob will not ask you to design individual ads for each campaign or platform. Instead, Google will take existing information from your ad text ideas and combine them with assets from your store listing. This will create a variety of ads that will be displayed in several formats across multiple networks.
All you need to do is provide some text for the ad, a starting bid, and set a campaign budget. You can also choose the preferred languages and locations for your ad campaign. You can even customize your campaign to focus on valuable users in a way that optimizes specific metrics such as in-app conversions.
How To Set Up Your AdMob Account

Go to the AdMob page and sign up for a new account if you don’t already have one. You can use your existing Gmail account to do this; Google will also prompt you to create accounts for AdSense and Google Ads. Fill the form with the following three details- your country, time zone, and currency.
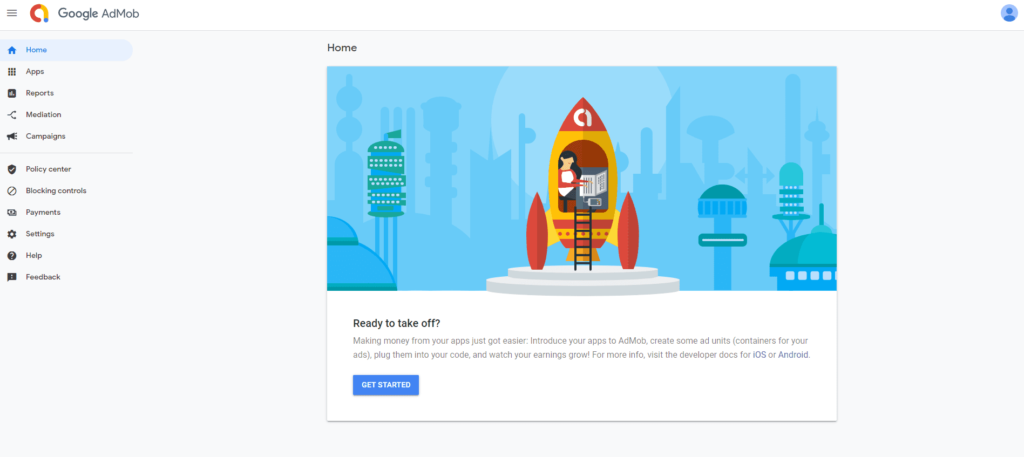
Accept the terms and conditions; you should now have a new AdMob account. Accept the confirmation email, and select the options you require from the page. Click “Continue to AdMob,” which should bring you to a page that looks like this-
Click on “Get Started,” which will display the following screen-
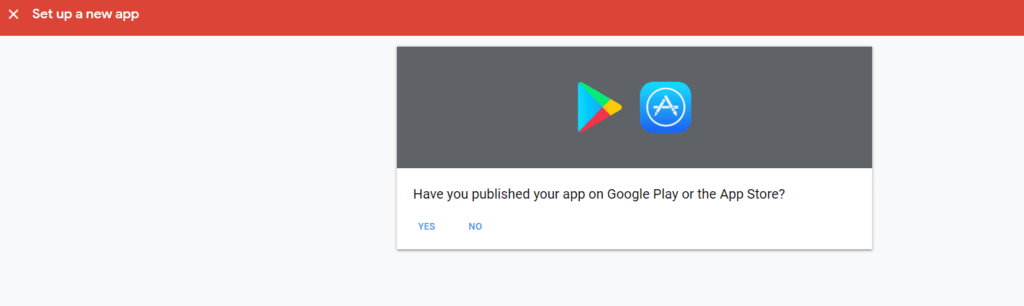
If you have already published the app on the App Store or Google Play, select YES otherwise, go with NO. We selected “NO,” which brings us to the next page, where you enter your app name (Demo App 1 for us) and select the platform (Android or iOS).
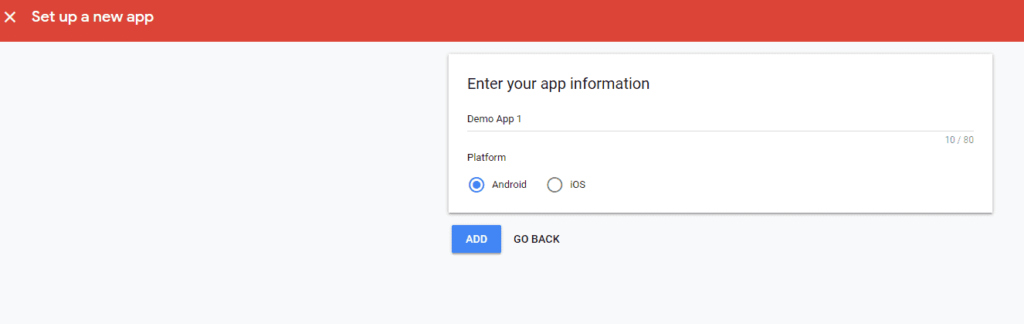
Click ADD, and pay close attention to the App ID value. In our case, it is ca-app-pub-2762263138663461~3916268552. Copy this to the clipboard, or write it down somewhere. You will need to add this id to your app source code later, along with the AdMob SDK.

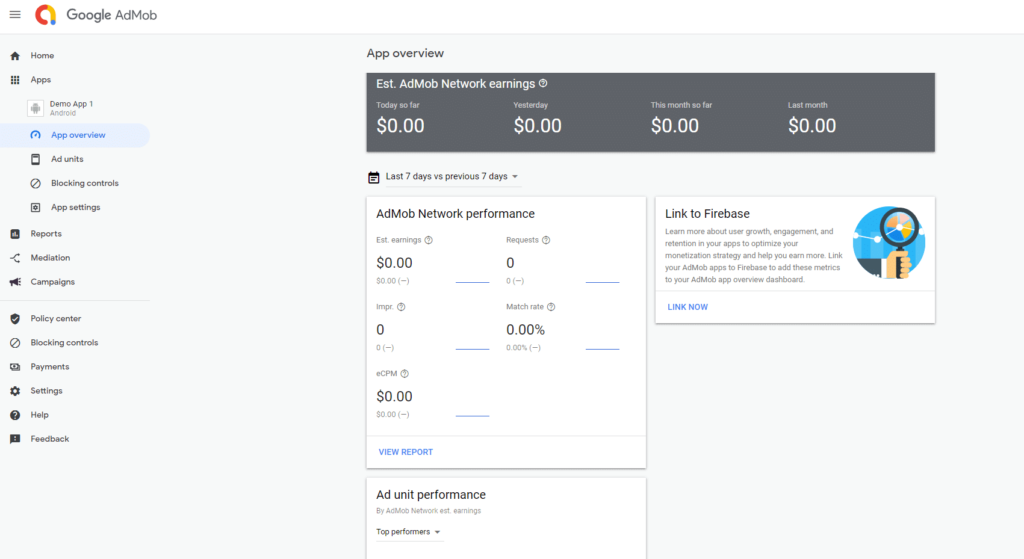
You can create the ad unit now, but we will skip it for later. First, we will explain what the 4 different types of ads are and how they work. Right now, you can see the dashboard for your AdMob account where displays data like estimated earnings. You can also set up new ad units (banner, interstitial, native, rewarded) and organize campaigns.
What Are The 4 Types Of Ad Units?

An ad unit is a type of ad integrated by developers into their apps, displayed to users to monetize traffic. Google AdMob allows you to incorporate 4 different types of ads into your app.
You can change the height and width of the ad, decide where it is placed (top, bottom, right, left, etc.), and even animate the ad (make it shrink or expand). But first, we need to understand what each type of ad does and where to use them.
Banner:
These are the little rectangular ads that appear on top of your app layout, allowing you to interact with the app even when the ad is being displayed. Banner ads tend to refresh over time, showing a new ad in place of the old one. If you don’t know too much about mobile advertising, these are a safe bet.
Interstitial:
Fullscreen ads cover the entire interface of the host app and are usually displayed during transition phases. For example, after the player finishes a level in the game. Or right after the app loading page and before the home screen of the app. Upon being shown an interstitial ad, the user can either tap on it, take them to the destination, or close the ad to return to the app.
Rewarded:
Basically, full-screen video ads prompt the user to watch a video in exchange for in-app currency. You might have come across these types of ads in endless runner games like Subway Surfer or Temple Run. In these games, you are given the option to watch a video ad in exchange for an extra life. Or, in farming games, you can request the player to watch a video ad in exchange for gold or other resources that they can use to upgrade buildings and characters.
Native:
Advanced ad type, which matches the look and feel of your app, exists as a seamless unit of the app design. Highly customizable, you can select the font, colors, and graphics to generate a smooth experience for your users. Best used in social media, communication, personalization, and lifestyle-based apps. Native ads have a higher response rate because they don’t stand out like banners or interstitials. Instead, they blend in with the surrounding content and display powerful messages to promote sponsored content for relevant users.
How To Create A New Ad Unit?

The process is similar for both Android and iOS apps. Go into your AdMob console, and to the left, you should see a bunch of options. Look for “Ad units,” which should be located right underneath “App overview.”
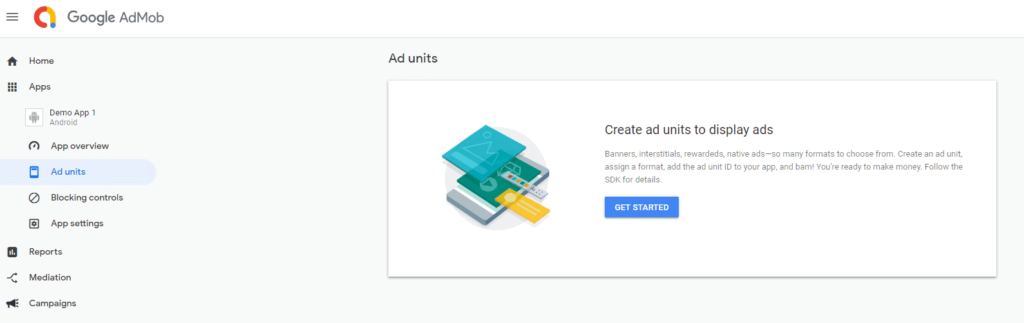
Click on “get started” to create a new ad unit; the next page will prompt you to select an ad format. You can see that this ad unit will be created for our app titled “Demo App 1”, and there are 4 options to choose from.
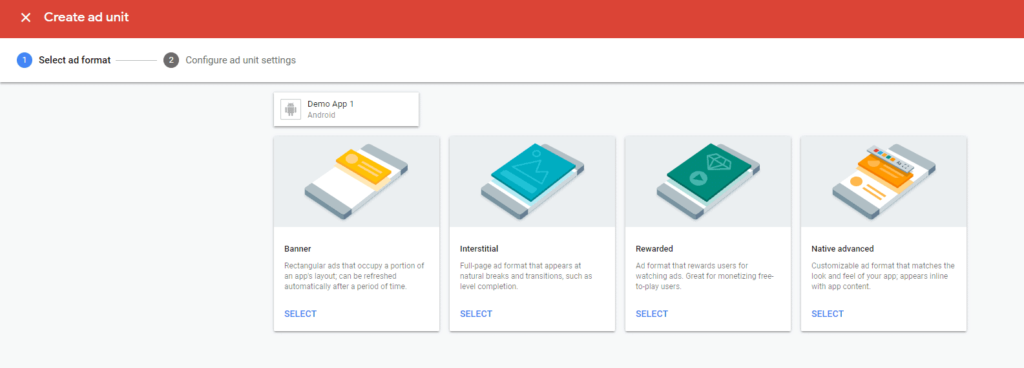
Let’s go with a banner ad. The next page allows us to configure our banner ad. We can name our ad and choose the type of media displayed on it (text, video, images, etc.). It is also possible to set the automatic refresh rate (how often the ad unit sends out a new ad request).
The Google optimized refresh rate will use algorithms to look at historical data on banner ads to calculate the best refresh rate for your app. Note that you should not make a new ad request when the device is turned off. By choosing “custom,” you can set a refresh rate of your own in seconds (range is 30 to 150). By disabling the automatic refresh altogether, you ensure that the same ad is displayed all the time.
This can cut into potential revenue but will also make the ad feel less obtrusive. For native ad types, the refresh rate is disabled by default to help them blend in with the rest of the app.

We will name our ad “Banner 1” and go with the default settings for the rest. We will also disable the eCPM floor, which essentially sets a minimum eCPM below which ads are not served to this ad unit.
What is eCPM? It is the “effective cost per thousand impressions,” i.e., an estimate of the revenue you receive per 1000 ad impressions. A higher eCPM floor will lower your ad unit’s fill rate and cut into revenue. You can manually set the eCPM floor, at which point you’re also given the option to add country-specific floors. Now, we can click “create an ad unit,” which brings us to the following screen.
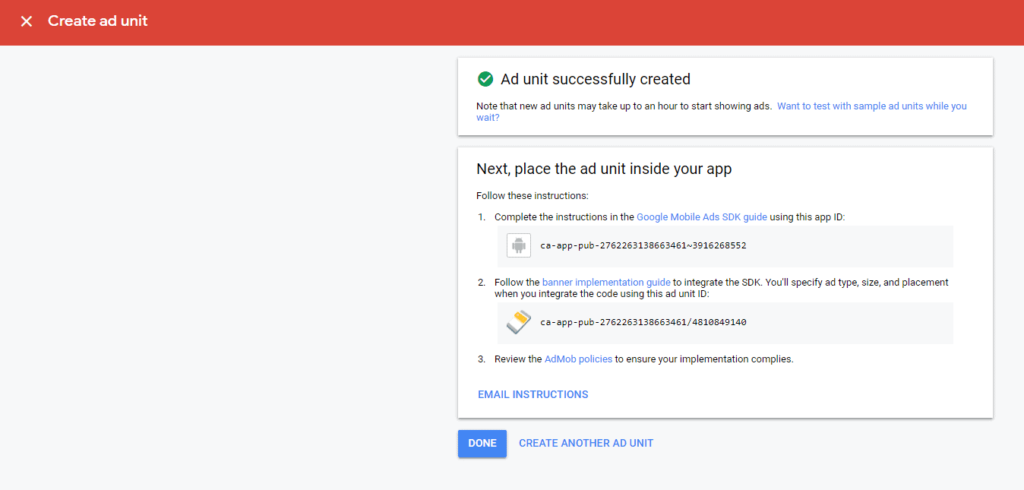
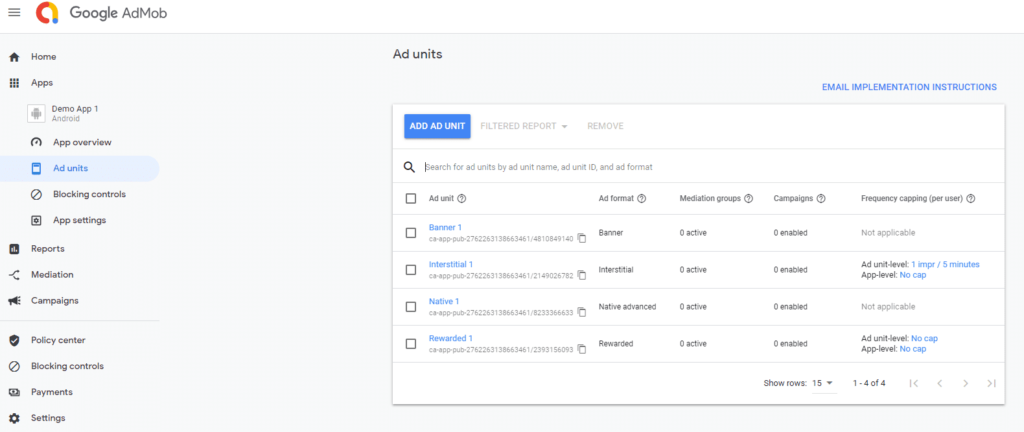
Note the ad unit ID generated: ca-app-pub-2762263138663461/4810849140; you will require this unique identifier to integrate the AdMob code into your app. Next, you can choose to exit or create a new ad unit.
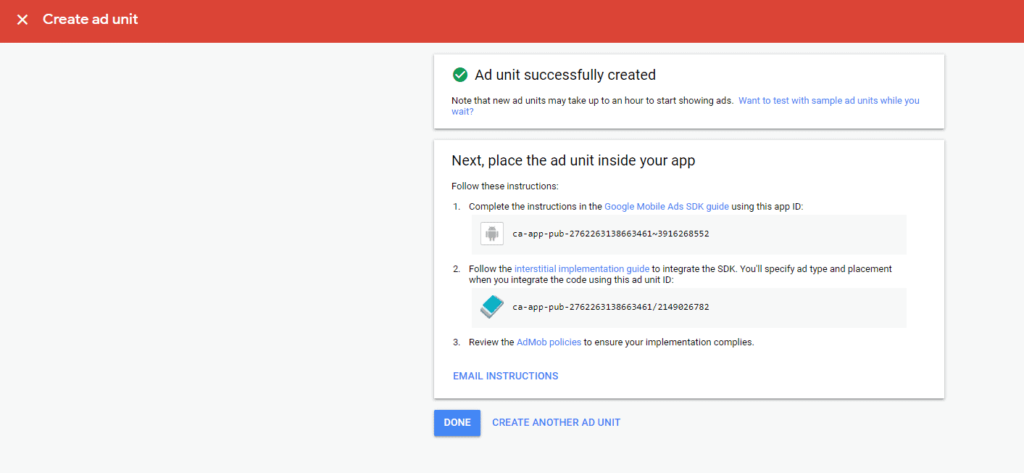
Let’s check out the interstitial ad unit; setting one up is very similar to banner ads. The only difference is that now we have “frequency capping” instead of “refresh rate.” Basically, you can tell AdMob how many interstitials it can show to the same person on a per minute, hourly, or daily basis. We set it to show no more than 1 impression per 5 minutes. Then we create our interstitial, titled “Interstitial 1”.

As usual, we receive a unique ad unit ID; this time, it is “ca-app-pub-2762263138663461/2149026782”.
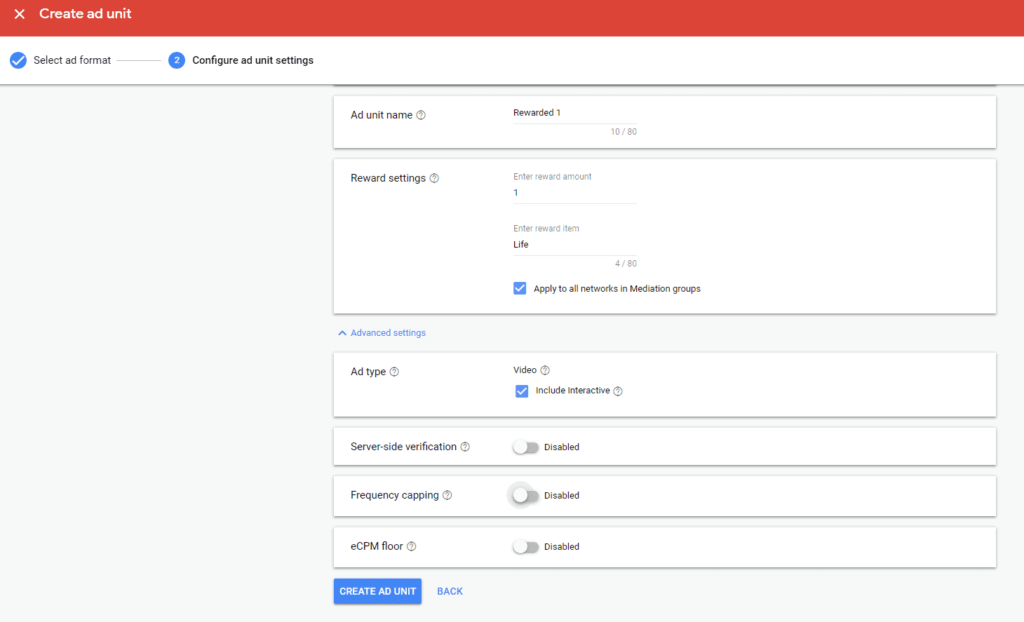
Next, we shall try out a rewarded video ad unit. We will call it “Rewarded 1”, and now we have a new set of options to play with. The Reward Settings allow us to do two things- we can state the number of rewards received by a user and the name of the reward item.
Say we have an endless runner game, where everyone starts with 3 lives. When all 3 lives are depleted, we give them a choice to watch a rewarded video for one extra life. So we set the reward amount to “1”, and the reward item is called “life.” We will leave the Ad type on default, allowing interactive ads.
You can also add server-side verification, which implements an additional layer of verification on top of client-side callbacks to ensure that the user has finished watching a video. For this, you will need a postback URL. We will leave frequency capping disabled, but you can enable it if you wish to limit the amount of rewarded videos per user.
We create our new ad unit and get a unique app ID. Let’s go ahead and note this one down because it will be required later when we integrate this ad unit into our app’s source code.

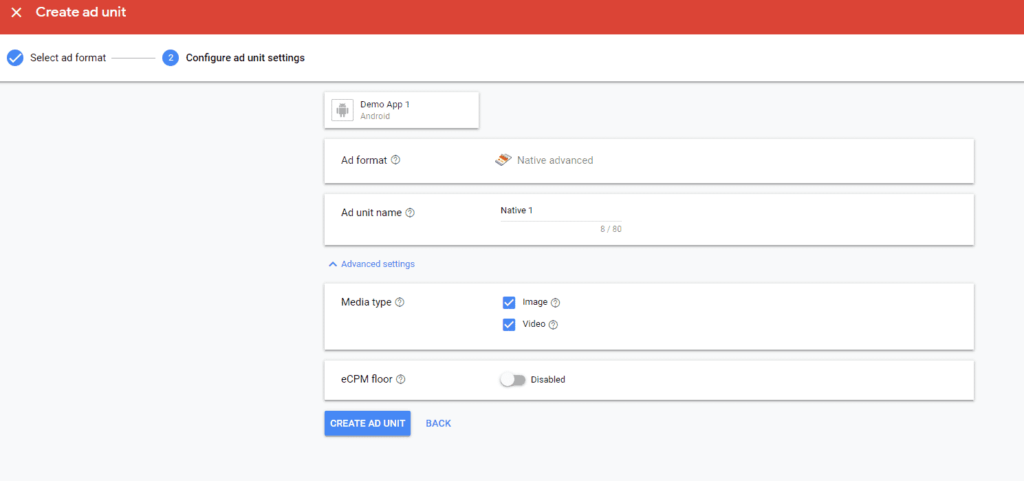
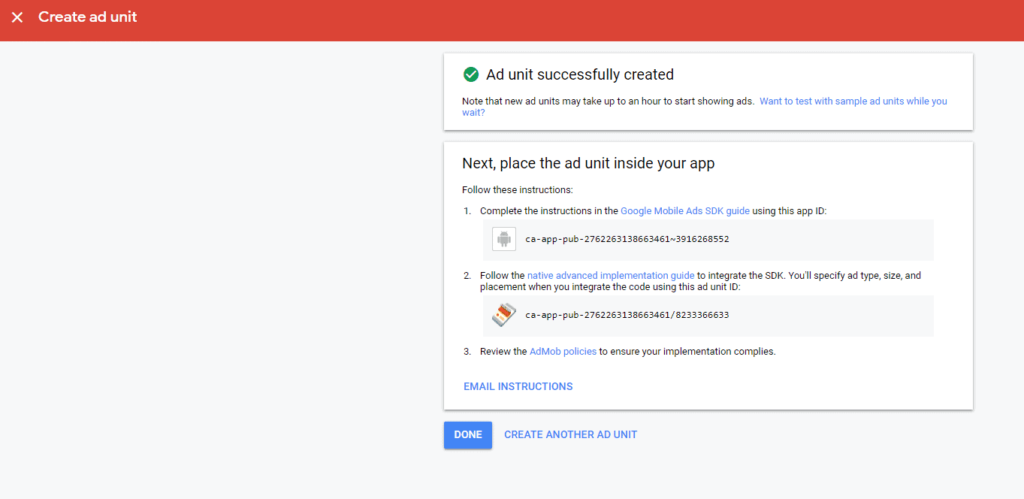
Finally, let us check out native ad units. Going with our previous naming scheme, this will be called “Native 1”. Even though native ads are the most advanced ad type and rather difficult to implement, there isn’t a whole of settings to mess with on this one. You just set a name, select the media type to be displayed, and enable/ disable the eCPM floor. We will go with the default, as we would like both images and videos to be displayed in our native ads.
After hitting create, we get a confirmation page containing our unique ad unit ID, which should be noted down. Now we have 1 ad from each type, and all of them can be managed from the AdMob dashboard.
Hit “DONE,” which will take you back to the dashboard. Here you can see each of the 4 ads we just created, and the unique ad unit IDs are also displayed alongside their names.
This exact same process can be used to create apps for iOS devices; go to your dashboard and click on the “Apps” icon, which will bring up a new menu from where you can view all your current apps and add new ones. We went ahead and created an iOS app titled “iOS App 1”.
Once you’ve selected “iOS App 1”, you can go ahead and create new ad units for it by following the exact same process we outlined earlier.
How To Link The Ad Unit Within Your App Source Code

Android:
First, you will have to import the Google AdMob SDK into your app. Once you’ve integrated the SDK, you can choose an ad format and customize the ad by changing its location, size, etc. Make sure you’re using Android Studio 3.2 or later, minSdkVersion 14 or later, and compileSdkversion 28 or later. Also, you should’ve already created a Google AdMob account and added an app if you followed the previous steps in this article.
Now, we are going to import mobile ads SDK. Your apps can import the SDK with a Gradle dependency which points to Google’s Maven repository. To use the repository, you must reference it in your app’s project-level build .gradle file. Open your app and look for an all projects section.
Here is an example of a project-level build.gradle
allprojects {
    repositories {
        google()
        jcenter()
    }
}
If the google() directive isn’t already present, add it. Now open the app-level build.gradle file and look for a “dependencies” section. Here is an example of what the app-level build.gradle looks like
dependencies {
    implementation fileTree(dir: 'libs', include: ['*.jar'])
    implementation 'androidx.appcompat:appcompat:1.0.2'
    implementation 'com.google.android.gms:play-services-ads:18.1.1'
}
Note the line in bold; it instructs Gradle to pull in the latest Mobile Ads SDK version along with any additional related dependencies. Now, save the file and do Gradle sync. The next step is updating your AndroidManifest.xml with the unique AdMob App ID that was given to you when you registered your app in AdMob. To do so, use the <meta-data> tag, as shown below:
<manifest>
    <application>
        <!-- Sample AdMob App ID: ca-app-pub-3940256099942544~3347511713 -->
        <meta-data
            android:name="com.google.android.gms.ads.APPLICATION_ID"
            android:value="YOUR_ADMOB_APP_ID"/>
    </application>
</manifest>
You can see we have a sample AdMob App ID; you will place the real one in android:value where it says “YOUR_ADMOB_APP_ID.” The App ID will be within the quotes. Finally, we need to initialize the mobile ads SDK. This can be done by calling MobileAds.initialize(), which will initialize the SDK and call back a completion listener. You only have to do this once, ideally during the app launch. Here is an example of the initialize method being called in an activity:
package ...
import ...
import com.google.android.gms.ads.MobileAds;
import com.google.android.gms.ads.initialization.InitializationStatus;
import com.google.android.gms.ads.initialization.OnInitializationCompleteListener;

public class MainActivity extends AppCompatActivity {

    protected void onCreate(Bundle savedInstanceState) {
        super.onCreate(savedInstanceState);
        setContentView(R.layout.activity_main);

        MobileAds.initialize(this, new OnInitializationCompleteListener() {
            @Override
            public void onInitializationComplete(InitializationStatus initializationStatus) {
            }
        });
    }
}
iOS:
We did it for Android; now, we’re going to see how to integrate the Google Mobile Ads SDK into your iOS app. For this, you’ll need Xcode 10 or higher and target iOS 8.0 or higher. We’re assuming you’ve already created your AdMob account and registered an iOS app by following the steps outlined previously in this article.
Let’s get started then. For this, we’re going to need CocoaPods, which will manage library dependencies for our Xcode projects. Open your project file in Xcode and add the following line to your app target:
pod 'Google-Mobile-Ads-SDK'Then, run this from the command line:
pod install --repo-updateDownload and unzip the SDK framework manually, then import the following parts into your Xcode project:
- GoogleMobileAds.framework
- GoogleAppMeasurement.framework
- GoogleUtilities.framework
- nanopb.framework
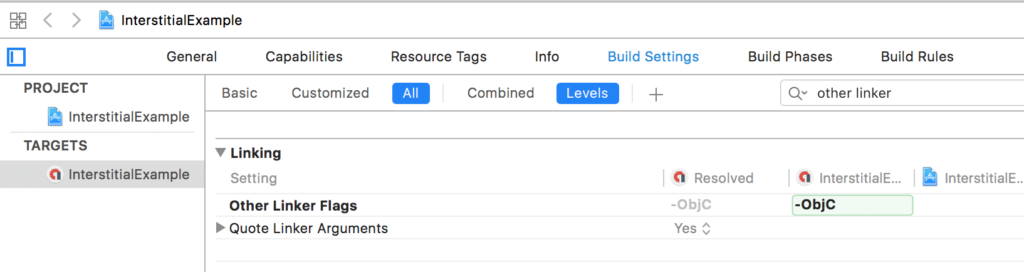
Add the -ObjC linker flag to Other Linker Flags in your project’s build settings:
Next, you need to add a GADApplicationIdentifier key within your app’s Info.plist file. This key must contain the string value of your unique App ID, which you can get from the AdMob dashboard. Here is the code to make the change-
<key>GADApplicationIdentifier</key>
 <string>ca-app-pub-3940256099942544~1458002511</string>
Alternatively, you can edit it in the property list editor:

Note the “ca-app-pub-3940256099942544~1458002511” App ID is a mere placeholder in our example; you will replace this with the actual one that you get from AdMob. Finally, we shall initialize our mobile ad. Before loading an ad, call the startWithCompletionHandler: method on the GADMobileAds.sharedInstance.
This should initialize the SDK and call back a completion handler once the initialization is complete (or after a 30-second timeout). Just like in the Android example, this only has to be done once, preferably during the app launch. Call startWithCompletionHandler: as early as possible.
Best Practices For Using Each Type Of Ad:

Banners:
Space is in short supply on the display of a mobile device. This means you need to take extra care in order to ensure that your banner ad isn’t encroaching on any of the interactive elements within your app. Users shouldn’t click a banner ad accidentally, so don’t place them next to buttons or text chat boxes. If your app is showing an image gallery, don’t pop a banner in the middle of images while the user is scrolling through.
The ad will stand out from the rest of the images, and you aren’t fooling anyone. This will annoy the user and disrupt their workflow. Banner ads can be customized to various shapes and sizes, so put in some time to ensure that the ad fits in perfectly within your specific app. Visually separate the banner from the rest of your app by using a visual cue like a non-clickable border. Allocate fixed space for your banner ad so it doesn’t bump up against other content when it loads in after an initial delay.
Interstitials:
The best place to put interstitials is between breaks in the action. Like when a user is on the pause screen in between two levels of a game. Or while they are switching between articles or activities. The key to interstitials is placing them right when the user is expecting a break, a pause in the flow of the app. If you’ve got a game that revolves around tapping the screen really fast, and your interstitial shows up in the middle of the action, the user will accidentally click it.
Bad clickthroughs don’t result in revenue for the advertiser, and your ad might even get removed. Users must be able to identify the app showing them an ad, according to AdMob policies. For instance, your interstitial shouldn’t be the first thing they see when opening an app or the last thing they see while exiting the app.
Rewarded Video:
When showing rewarded video ads, you want to make sure that you know your target audience. For instance, if you’ve got a food app and the rewarded video is an ad for cars, you don’t get any engagement from your users. Use Google Analytics and ad filters to make sure that the videos shown within your app are customized to suit the user’s needs better.
Placement is also important; you don’t want the video to pop up in the middle of an action. Like when the user is playing a game or cooking from a recipe being displayed in your app. Place your video ad such that the user is happy to engage with it, not annoyed by its presence. A nice example is in the game Temple Run when you lose all your lives, and a rewarded video ad pops up. This gives you the option to watch a video in exchange for an extra life.
Native:
Use ad templates that closely match your content to make sure that the native ad doesn’t stand out within the display. Make sure the ad is the same size and shape as the rest of your content blocks within the app. Try to implement ads that serve the same goal as your app content.
For instance, if you’ve got an app that books train tickets, you can set up an ad that shows discounts on ticket fares between certain routes. If the predefined templates don’t match your goals, use the custom CSS editor to modify the look and feel of your ads.
Thanks for this article Jacob. Incredibly useful and helpful as we’re just finalising the last pieces for our first indie mobile game.
One question – if I set up the ad units having ticked the option syaing it’s not live on either of the Android or iOS app stores, do I need to do anything once it goes Live. I am presuming not given the set up steps but thought I would asked a seasoned game developer.
Hi Peter,
Glad I could help! Congrats on your first mobile game!
Yes, you will need to link the app to the corresponding store (Google Play\ App Store).
This can be done via the app settings menu, use the app ID to search for your app.
you may have to wait several days after the publications if it doesn’t find it right away.
Good luck!